Beginner's Guide to MQTT on TC002
- Supported device: Ulanzi TC002
- Software: Ulanzi Studio V3.1.0 or later
1. Overview
MQTT connects TC002 to flexible automation and data-control workflows. With Ulanzi Studio, you can send text, status information, or automation commands to the device and use it as a desktop information display.
For example, you can:
- Send text or control commands to TC002 through MQTT.
- Connect Home Assistant and update the display automatically.
- Integrate tools such as Node-RED and ESPHome.
This guide covers the complete process from deploying an MQTT service to connecting TC002.
2. Requirements
- TC002 is connected to your local 2.4 GHz Wi-Fi network.
- A computer running Windows 10 or later, or macOS 12.0 or later.
- The computer and TC002 are on the same local network.
- To use the Home Assistant integration, install and start Home Assistant in Docker first.
For a quick way to try TC002 MQTT, use PixDeck.
Install Python on your computer, then follow the steps for your operating system.
Windows:
Press Win + R, enter cmd, and press Enter. Run these commands in Command Prompt:
git clone https://github.com/cailurus/PixDeck.git
cd PixDeck
python pixbar_panel.py
The following message confirms that PixDeck started successfully:
pixbar_panel -> http://127.0.0.1:8000macOS:
Open Terminal and run:
git clone https://github.com/cailurus/PixDeck.git
cd PixDeck
python3 pixbar_panel.py
PixDeck is ready when the terminal displays http://127.0.0.1:8000.
Open http://127.0.0.1:8000 in Chrome, Edge, or Safari. The PixDeck logo should appear at the top of the page, with a device status card in the center.
- Find the device card at the top of the page.
- Click the gear icon in the upper-right corner of the card.
- Enter the local IP address of your TC002 in the Device IP field.
- Click Save.
Continue with the steps below if you want to configure the complete MQTT workflow manually.
3. Deploy an EMQX server
EMQX is an open-source, high-performance MQTT message server. It acts as the message broker between TC002 and MQTT clients.
3.1 Download EMQX
Download the package for your operating system from EMQX Downloads.
Direct Windows downloads are not listed after EMQX v5.3.2. Windows users can download EMQX v5.3.2. This guide uses
emqx-5.3.2-windows-amd64.zipon Windows 10. You can also deploy EMQX with Docker.
See also: EMQX deployment reference.
3.2 Install and start EMQX
- Extract the downloaded archive.
- Open the
emqx/bindirectory. - Open Command Prompt as Administrator in that directory and run:
.\emqx install
.\emqx console
.\emqx start
After .\emqx console, the terminal displays the EMQX logs. EMQX is running confirms that the server started successfully.
3.3 Open the EMQX dashboard
Open http://127.0.0.1:18083 in a browser.
Use the default credentials for the first sign-in:
- Username:
admin - Password:
public
Set and remember a new administrator password when prompted.
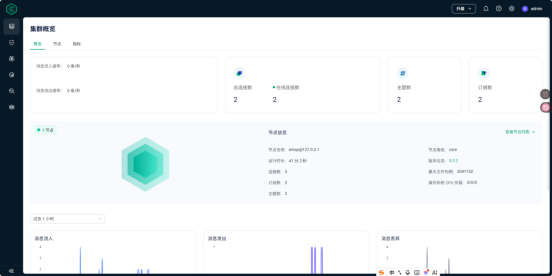
EMQX is now running on your computer.
4. Connect TC002 to MQTT
4.1 Find the computer's IPv4 address
Find the local IPv4 address of the computer, usually in the form 192.168.x.x.
- Windows: run
ipconfigin Command Prompt and find IPv4 Address. - macOS: run
ifconfigin Terminal and find theinetaddress foren0oren1.
4.2 Configure MQTT in Ulanzi Studio
Open the TC002 app settings in Ulanzi Studio and find MQTT:
- MQTT server: enter the computer's IPv4 address, such as
192.168.1.100. - Port: keep the default
1883. - Complete other fields if required by your setup.
Click Save. After TC002 connects, the device appears as a connected client under Cluster Overview in the EMQX dashboard.
5. Send commands with MQTTX
MQTTX is an open-source MQTT client for Windows, macOS, and Linux. It can test custom display commands without writing a complete application.
5.1 Install MQTTX
Download MQTTX from https://mqttx.app/.
5.2 Configure a connection
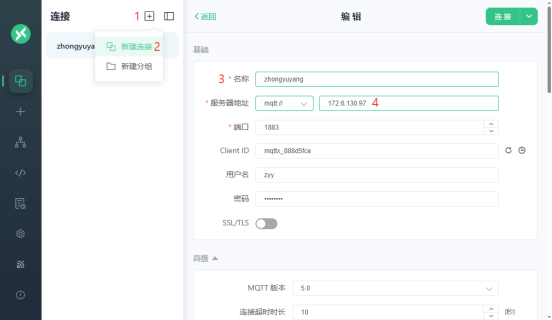
Create a connection in MQTTX:
- Name: any descriptive name.
- Server: the local IPv4 address of the computer. Do not use
broker.emqx.io. - Port:
1883. - Complete other fields if required.
Click Connect.
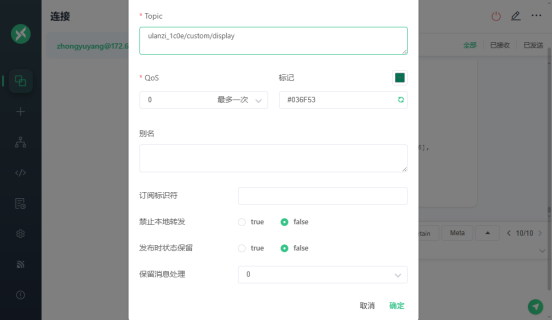
5.3 Subscribe to a topic (optional)
Add a subscription topic in MQTTX if you want to monitor messages reported by TC002.
5.4 Send a display command
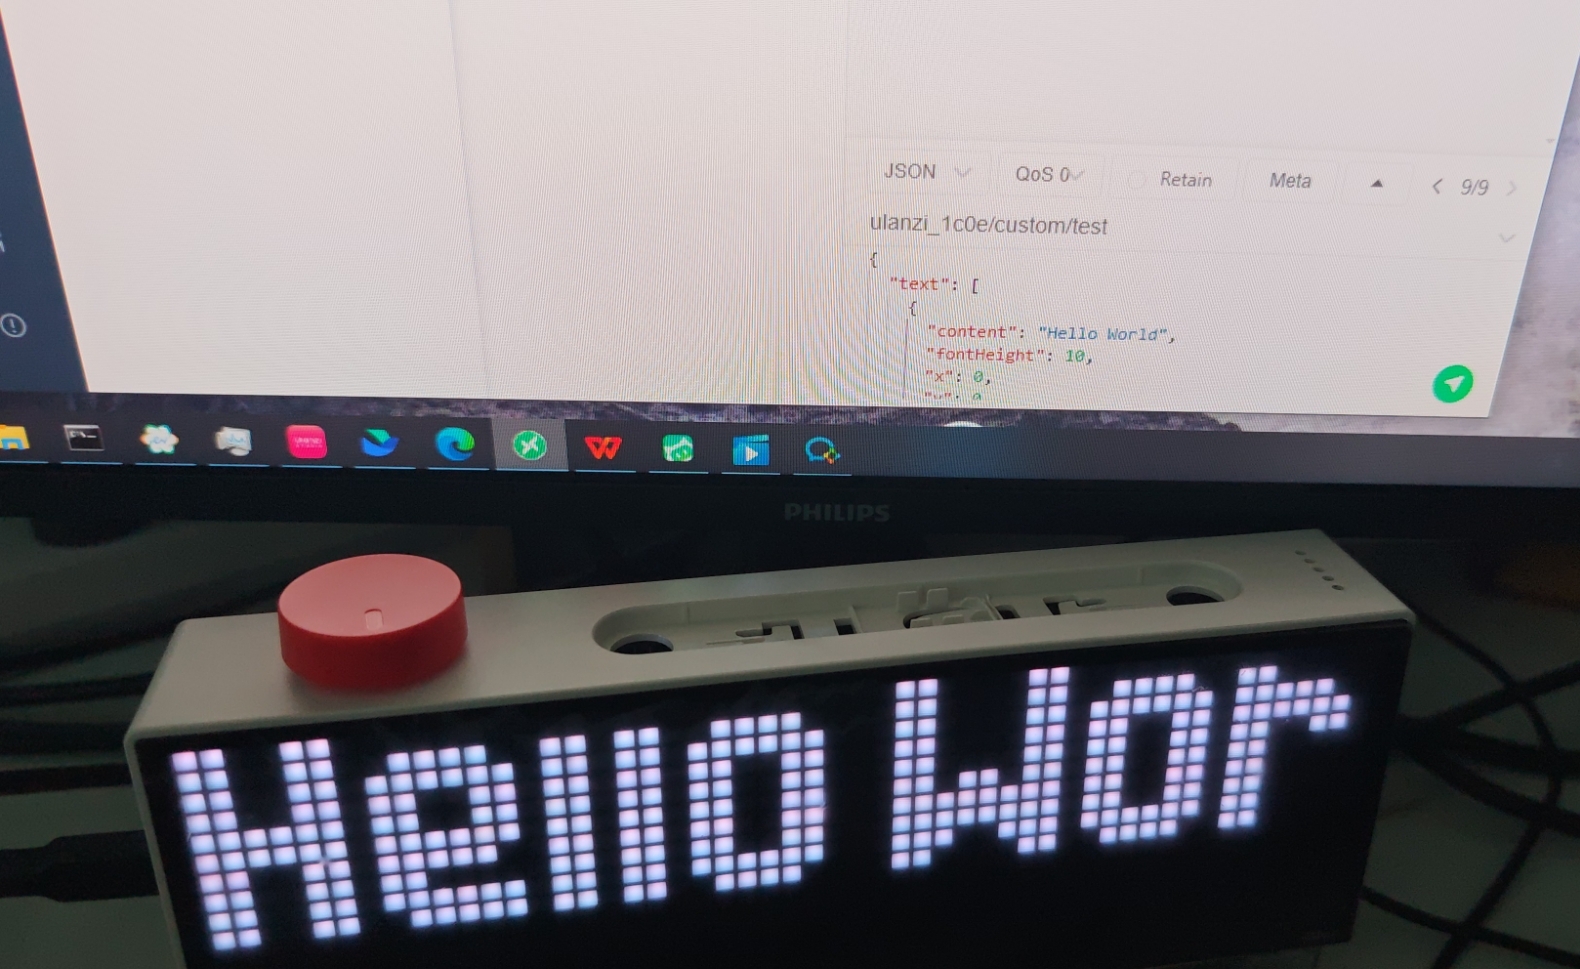
Enter a Topic and Payload in MQTTX to send custom content to TC002.
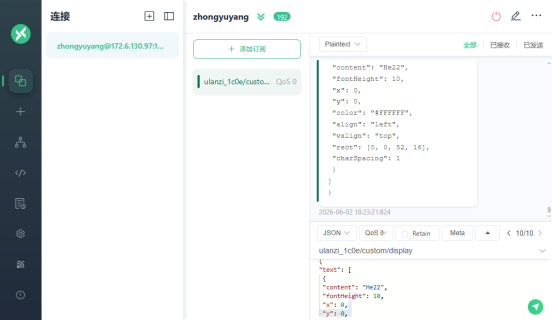
The following example displays Hello World:
{
  "text": [
    {
      "content": "Hello World",
      "fontHeight": 10,
      "x": 0,
      "y": 0,
      "color": "#FFFFFF",
      "align": "left",
      "valign": "top",
      "rect": [0, 0, 52, 16],
      "charSpacing": 1
    }
  ]
}
Click Send. Hello World appears on the DIY screen of TC002.
6. Integrate Home Assistant
6.1 Install Home Assistant
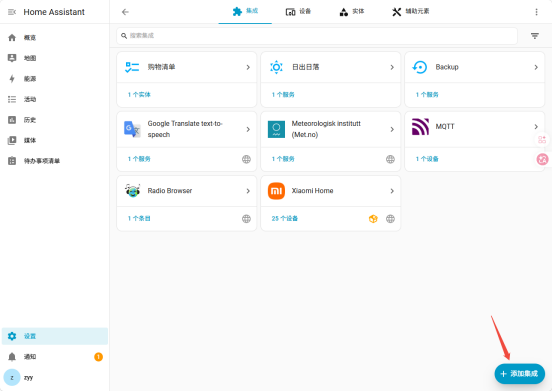
Install and start Home Assistant in Docker. If it is not installed, see:
6.2 Add the MQTT integration
- Go to Settings > Devices & services in Home Assistant.
- Click Add Integration in the lower-right corner.
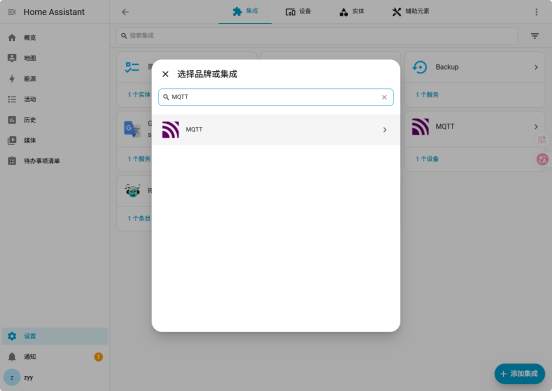
- Search for
MQTTand select it.
After it is added, return to Devices & services, select MQTT, and open its configuration.
6.3 Configure the MQTT broker
- Broker: enter the computer's IPv4 address.
- Port: keep
1883. - Username and password: enter them if your broker requires authentication.
- Discovery: enabling it is recommended.
Click Save.
6.4 Verify the connection
Open the EMQX dashboard at http://127.0.0.1:18083. Cluster Overview should show two connected devices.
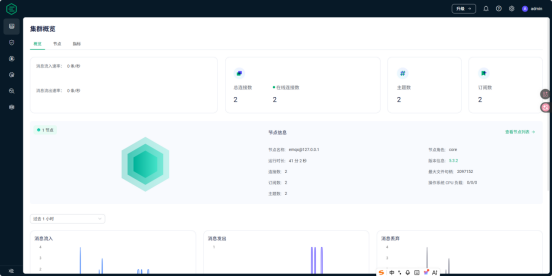
Open Clients and confirm that Home Assistant and TC002 are connected. Then open WebSocket Client and click Connect.
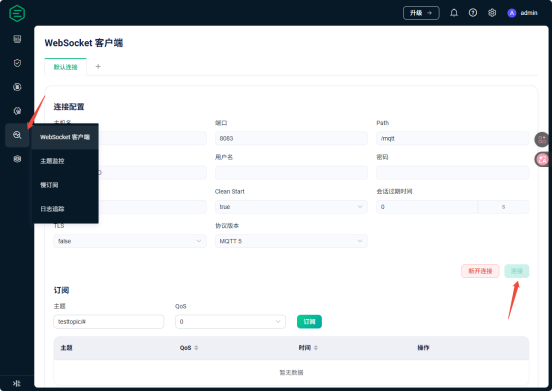
Return to Cluster Overview. The connection count should now be three, confirming that the MQTT communication path is working.
7. Configure a Home Assistant blueprint
A blueprint is a reusable Home Assistant automation template.
7.1 Get a blueprint YAML file
Choose one of these methods:
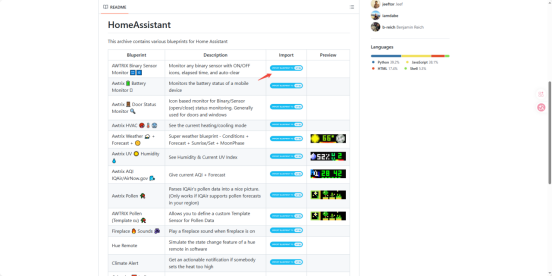
Import from a repository
Browse the templates in the Home Assistant blueprint repository, choose an effect, and click Import.
Create your own YAML
Write a blueprint, publish the YAML file at an HTTP address, and enter that address on the Home Assistant blueprint import page.
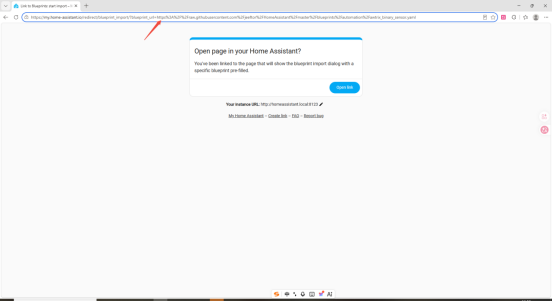
You can also use the included light.yaml example to test a lighting effect.
7.2 Place the blueprint file
Either mount the file into the container's config directory or open the Home Assistant configuration folder manually.
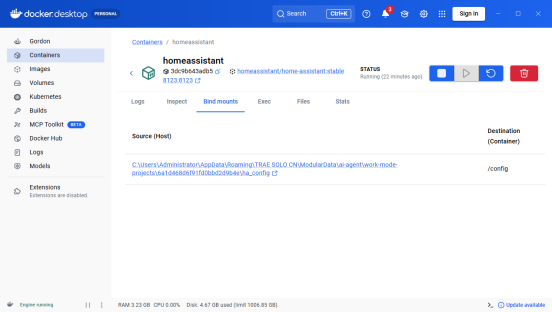
Place the YAML file under:
ha_config/blueprints/automation/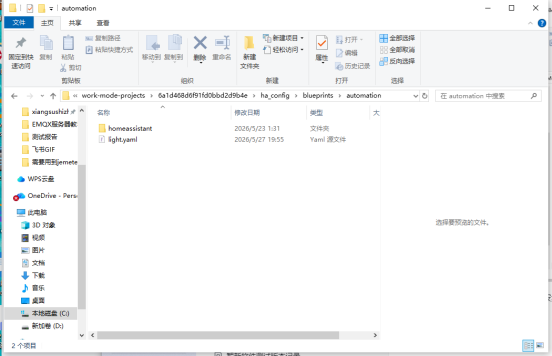
8. Create an automation from the blueprint
- Go to Settings > Automations & scenes.
- Click Create Automation.
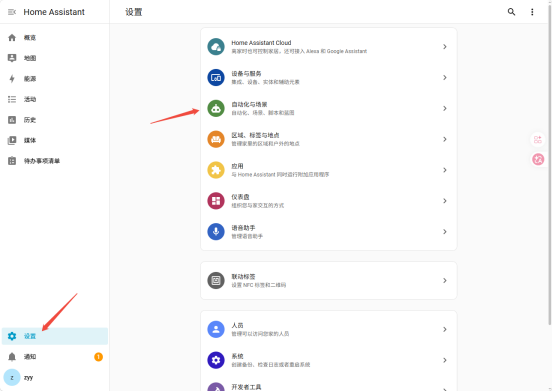
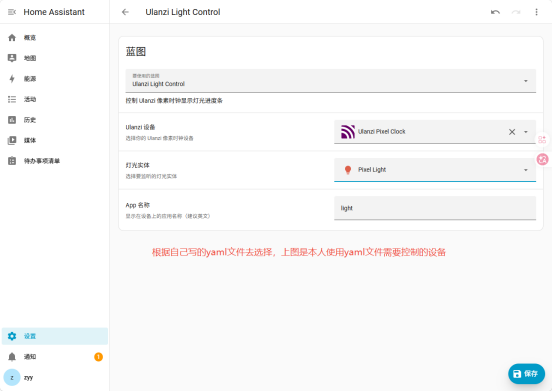
- Select the imported blueprint and complete its settings.
- Click Save.
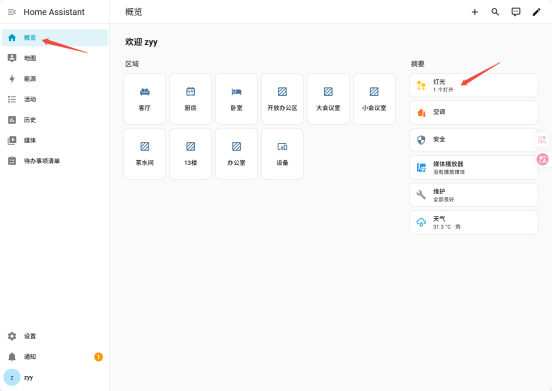
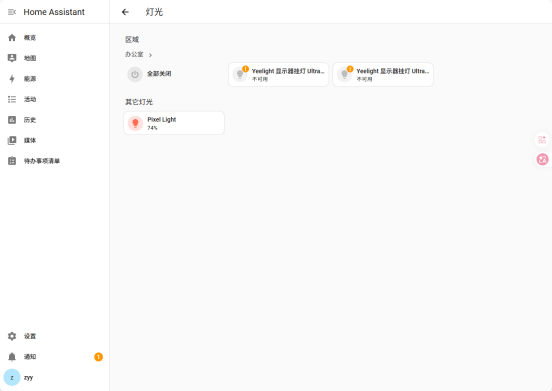
- Go to Settings > Devices & services > Entities and confirm that the entity exists.
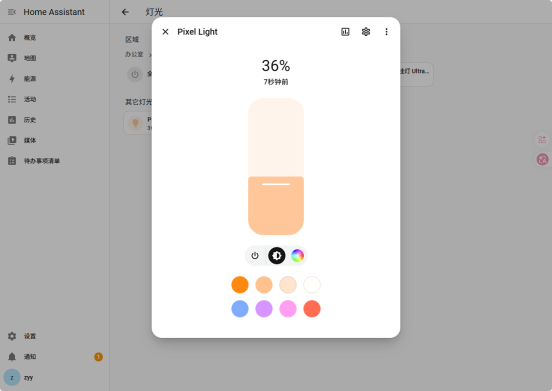
- Open Overview to find the entity card.
9. View the result
Switch TC002 to the DIY module to see the effect configured through Home Assistant.
The full MQTT setup is complete. You can now send custom text and animation commands from MQTTX, control the display with Home Assistant automations, or connect platforms such as Node-RED and ESPHome.
10. References
- EMQX
- EMQX v5.3.2 for Windows
- MQTTX
- Home Assistant blueprint repository
- Ulanzi Home Assistant guide
- Home Assistant Docker guide
- EMQX deployment reference
- AWTRIX protocol
- Ulanzi FAQ
Update TC002 to the latest firmware for the best MQTT compatibility. If a problem persists, visit the Ulanzi FAQ or contact technical support.